The following step-by-step guide shows you how to log in, design a postcard and identify the audience of your EDDM campaign. It’s easy as can be!
AMPlified Mail helps organizations of all sizes identify their target audience, create marketing postcards and mail to them using Every Door Direct Mail® (EDDM). EDDM is a cost-efficient way to reach the residents of your target neighborhoods.
AMPlified Mail User Guide - EDDM
1. Go to amplifiedmail.com.

2. Click “Login.”

3. Sign in or create an account.

4. Once you’ve signed-in, return to the home page and click the “Start Today” button.

5. Choose “Every Door Direct Mail” and then “Continue.

6. Select one of the three pre-approved postcard size options. Click “Continue.”

7. Next, you design your postcard: Select “Not a graphic designer? Start Here,” to get the process rolling. You can select one of our design templates to modify or start with a blank page.
Have artwork that is ready to go? Choose the “Upload my own postcard” option.”

8. Select your industry from the dropdown menu. Click “Continue.”

9. Now comes the fun part. Experiment with our various templates and tools to create a postcard that meets your liking. Add text boxes, pick your font, change colors, upload existing assets like your logo and important images and so much more.


10. When you are ready to design your mailer back, click the gray box at the top. Don’t forget to include your important contact information like your phone number and business address.

11. Once your mailer is ready to go, click the “eyeball” to preview your design.

Everything look great? Perfect! Click the “X” to return to the design tool.

Click “Save” and select “Save postcard” from the dropdown to save your art and click “Save” and select “Order” from the dropdown.

12. Give your postcard one more look. If it is ready to go, click “Continue.”

13. Choose to either look up your target routes based on an address or type in your routes directly.

If you choose to look up your routes based on an address, you will see a map similar to the following images but based on the address you enter.


If you prefer to enter your own routes, you will see the following screen. Enter the required information and continue.

14. Need additional copies of your postcard mailed to you?
Yes? Choose the quantity and fill out your contact information for shipping and click “Next.”
No? Choose “No, not this time” and click “Next.”

15. Now, you will have the opportunity to review your order. If it looks good, add it to your cart. If you need to make changes, click the “Back” button.

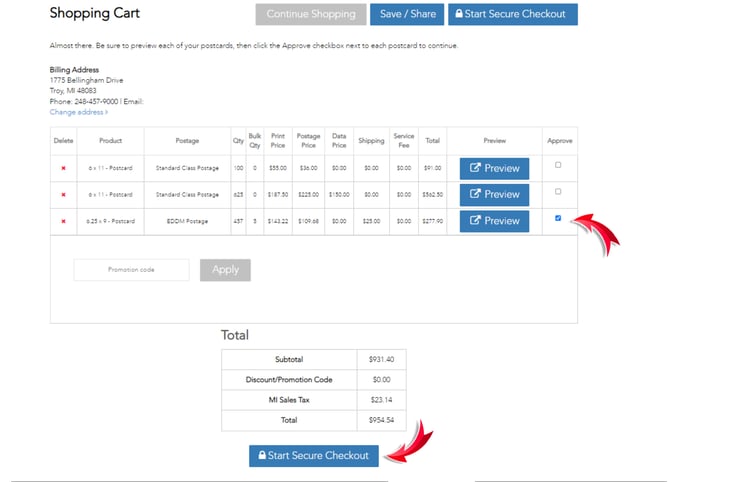
16. After adding the order to your cart, check the “Approve” box or boxes, select “Start Secure Checkout” and enter your billing information.

And that’s it! The rest is on us! We will process the list for mailing, print the postcards and deliver them to the post office.
See how easy it is?
Do you need a few tips that will help you design postcard mailers that work? See these blogs:
Leverage the Power of Print and Digital Combined
USPS Marketing Strategies
Have your own mailing list? Use our Targeted Direct Mail tutorial.